
Brewing Coffee While Camping: brewing coffee while camping gear and tips
Before you can even think about that perfect cup of coffee at sunrise, you’ve got to get your gear sorted. A solid camp coffee kit really boils down to three things: a reliable brewer, a way to heat water, and of course, your favorite coffee beans. Nail these three, and you're well on your way to brewing coffee in the wild that’s just as good as what you’d make at home.
Building Your Ultimate Camp Coffee Kit
Making an incredible cup of coffee outdoors isn't about hauling your entire kitchen into the woods. It’s about being smart and intentional with your gear, choosing pieces that are tough, portable, and get the job done without a fuss. A well-thought-out kit makes the process feel like part of the adventure, not a chore. The real goal is to build a setup that fits your style of camping, whether you’re a car camper with plenty of space or a backpacker counting every last ounce.
Your kit can be as simple or as complex as you want, but a few key items are the backbone of any great setup. Let's look beyond just the brewer and think about the whole process.
Essential Gear Beyond the Brewer
The brewer might get all the glory, but the supporting cast is just as critical. A wobbly setup can quickly lead to spilled water, lukewarm coffee, and a whole lot of frustration. First up, your heat source. A small, single-burner camp stove is fantastic for precise temperature control, which is a game-changer for methods like pour-over. If you're going for a more rustic vibe, a campfire-safe kettle is a great choice, but it definitely needs a bit more attention.
Next, think about what you're drinking from. An insulated mug is a must-have—it’s non-negotiable for keeping your coffee hot against that morning chill. And while it might seem like a luxury, a lightweight gooseneck kettle can seriously up your pour-over game by giving you a slow, controlled stream of water. Don't forget something to haul water from the source back to your campsite, either.
The Great Debate: Whole Bean vs. Pre-Ground
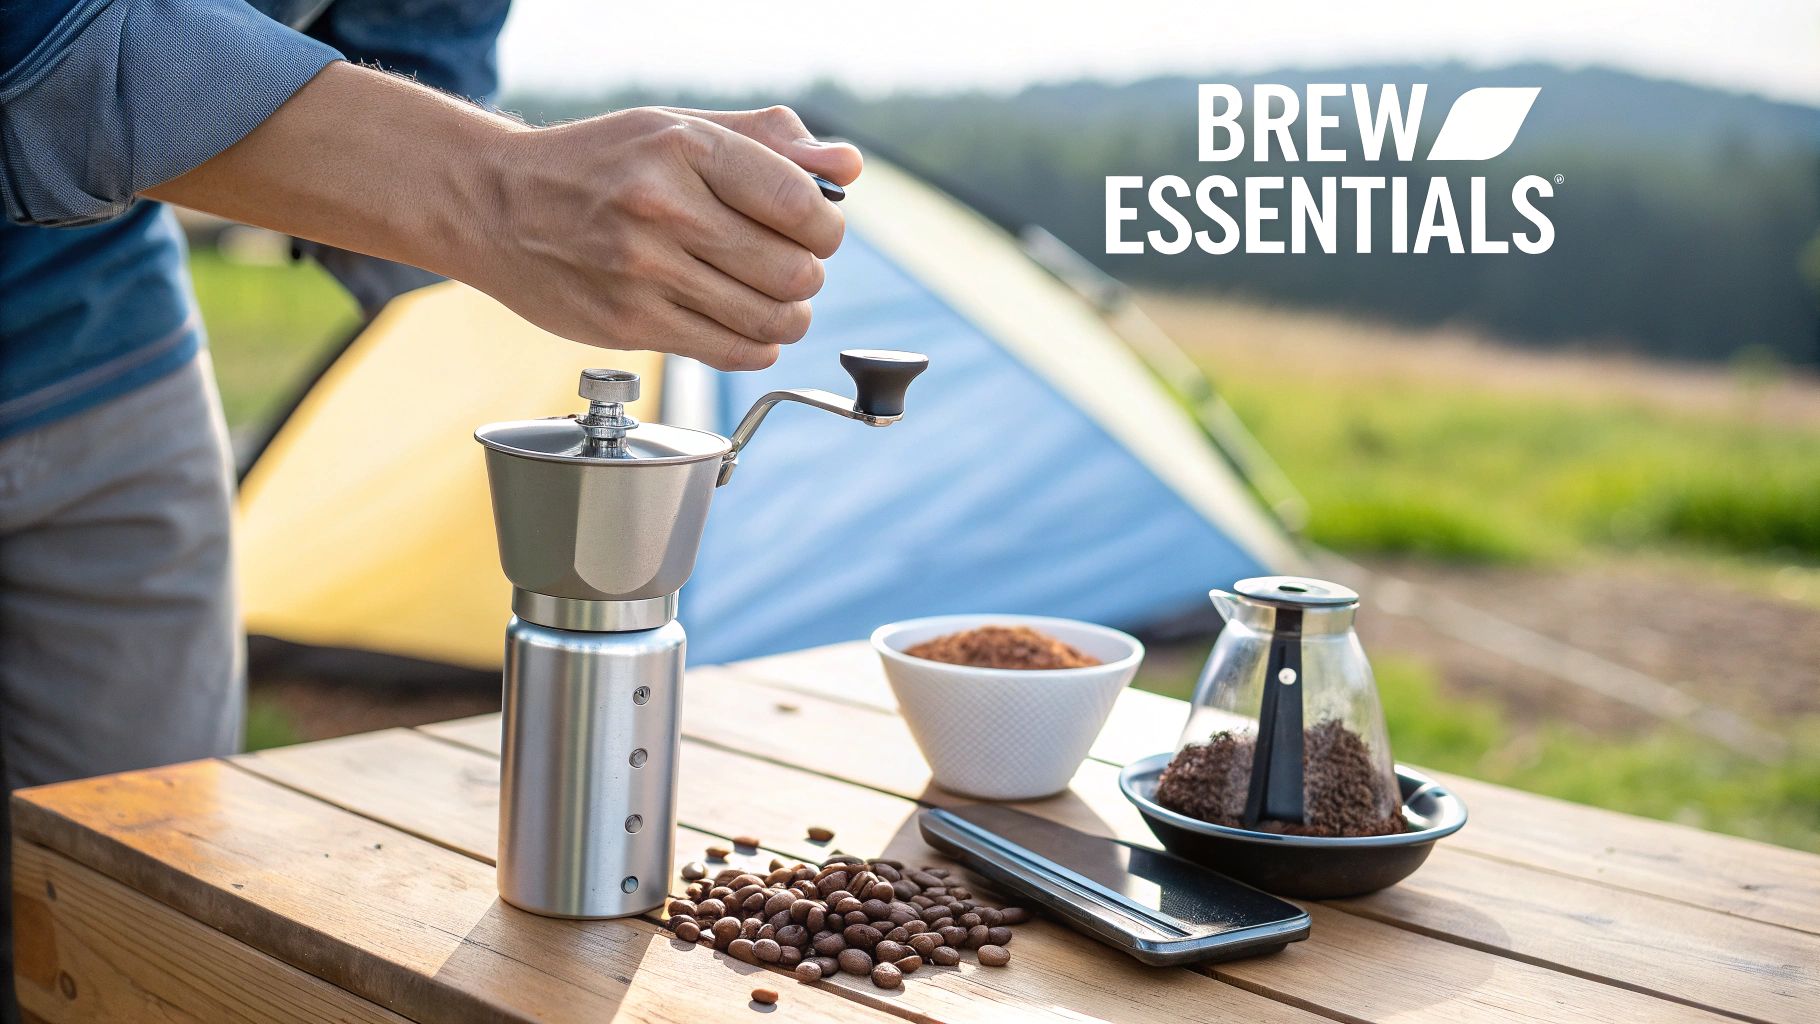
For the absolute freshest, most flavorful cup, nothing beats packing a manual hand grinder and whole beans. Grinding right before you brew releases all those amazing aromatic oils, giving you a vibrant cup that’s bursting with flavor. This is the purist's approach, and honestly, the difference in taste is huge.
But let's be real—convenience is king in the wild. Pre-ground coffee saves time, space, and a bit of elbow grease. If you decide to go this route, just make sure you grind the beans as close to your trip as possible. Store them in an airtight, dark container to keep them as fresh as you can.
Pro Tip: If you're pre-grinding, portion out your coffee into small, sealed bags for each day. This stops you from exposing the whole batch to air every time you make a cup, which helps keep the grounds from going stale halfway through your trip.
Choosing Your Camp Coffee Brewer
Now for the heart of your kit: the brewer. Every style offers a different trade-off between portability, ease of use, and the kind of coffee it produces. Your choice should really come down to your camping priorities. Are you an ultralight backpacker, or do you set up a basecamp with all the comforts of home?
To help you figure it out, I’ve put together a quick comparison of the most popular options out there.
Choosing Your Camp Coffee Brewer
Picking the right brewer can feel overwhelming, but it really comes down to how you camp and what you value most in a cup of coffee. Think about weight, how much fuss you're willing to put up with, and the flavor profile you love. This table breaks it down to make your decision a little easier.
| Brew Method | Best For | Weight and Portability | Ease of Use and Cleanup | Flavor Profile |
|---|---|---|---|---|
| AeroPress | Solo travelers, backpackers, and coffee geeks who want versatility and a quick, clean cup. | Excellent. It's lightweight, nearly indestructible, and compact. Models like the AeroPress Go Coffee Maker even pack into their own mug. | Super easy. The brew time is just 1-2 minutes, and cleanup is a breeze—you just pop out the coffee "puck." | Clean, bright, and full-bodied with low acidity. You can make anything from an espresso-style shot to a standard Americano. |
| French Press | Groups, car campers, and anyone who loves a rich, full-bodied brew with a classic, no-fuss feel. | Moderate. Glass models can be bulky and fragile. Your best bet is a durable stainless steel or plastic version for camping. | Simple to use, but cleanup can be a bit messy. It requires a good amount of water to rinse out all the grounds. | Rich, robust, and oily with a heavy mouthfeel. You'll likely get a little sediment (silt) at the bottom of your cup. |
| Pour-Over | Coffee purists, car campers, and anyone who enjoys the deliberate, hands-on ritual of brewing. | Excellent. Collapsible silicone or flat-pack metal drippers are extremely lightweight and take up almost no space. | It requires some patience and a steady hand for pouring. Cleanup couldn't be easier, though—just toss the paper filter. | Clean, nuanced, and bright. This method is amazing for highlighting the subtle flavor notes of single-origin beans. |
Each of these brewers has its own personality and excels in different situations. The AeroPress is a fantastic all-rounder, the French press is a classic for a reason, and the pour-over delivers a truly exceptional cup if you’re willing to put in the time. Whichever you choose, you're on the right track to making incredible coffee outdoors.
Mastering Campfire and Stovetop Brewing
There’s nothing quite like brewing coffee while camping. Whether you’re working with the raw elements of a crackling campfire or the focused heat of a camp stove, the whole experience connects you to the outdoors. It turns a simple morning routine into a memorable ritual.
So, let's move past the gear lists and get our hands dirty with the actual techniques for crafting that perfect cup in the wild.
At its core, brewing great camp coffee is pretty straightforward. You just need to nail the fundamentals.
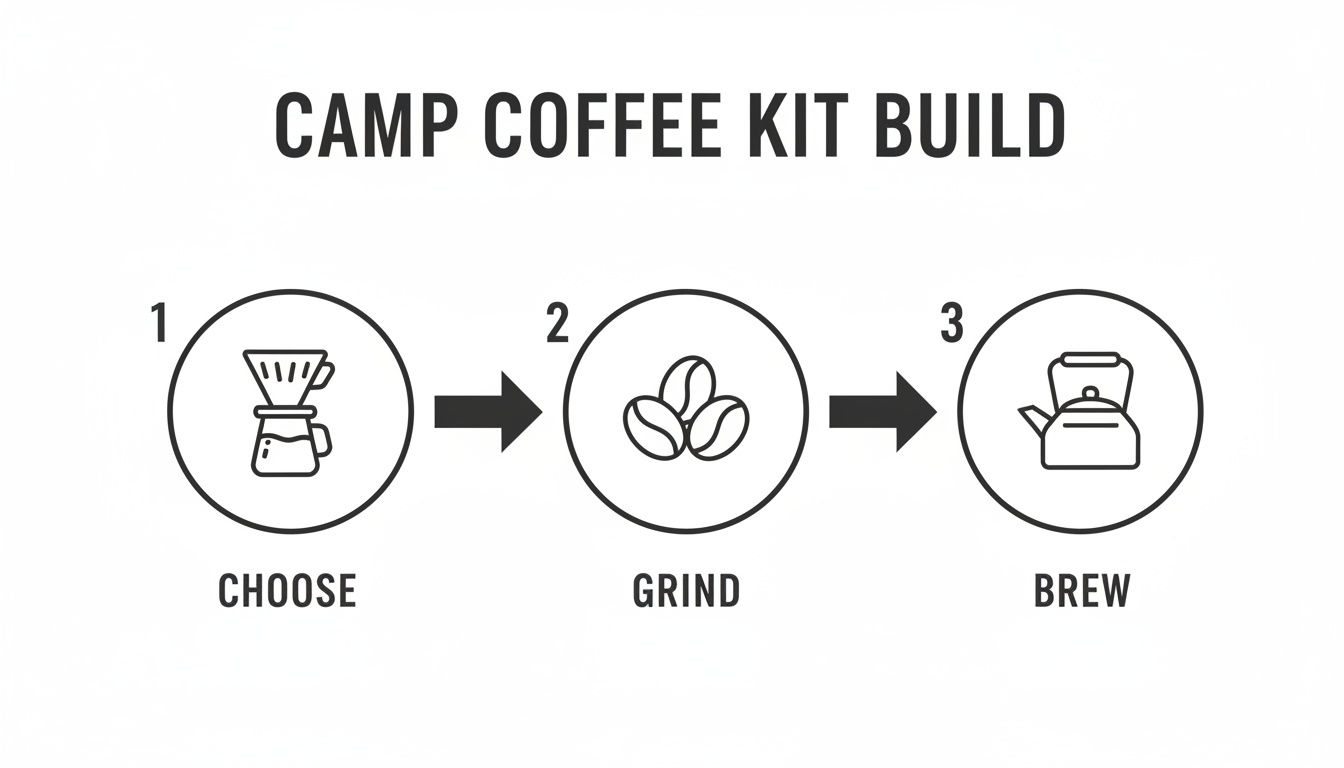
This simple flow—choosing your brewer, grinding your beans, and making the magic happen—is the foundation of every great cup you'll make at the campsite.
Taming the Campfire for Coffee
Brewing over an open flame is easily the most rustic and rewarding way to make your morning coffee. It takes patience and a real feel for the fire, but the result is a rich brew with an atmosphere you just can't beat.
The real key is to avoid placing your kettle or pot directly in the roaring flames. That’s a fast track to scorched coffee and damaged gear.
Instead, your goal is to create a stable, consistent heat source. Let the fire burn down to a bed of glowing coals, which provides a much more even and manageable temperature. A sturdy campfire grate is your best friend here, giving you a level surface to work on.
For this method, a stainless steel French press or a classic percolator is perfect. They’re tough enough to handle the rugged environment of a campfire.
A Note on Cowboy Coffee: This old-school method is as simple as it gets: boil coarse grounds directly in a pot of water. After boiling, you take it off the heat and add a splash of cold water, which helps the grounds settle to the bottom. It’s effective, but getting a grit-free pour definitely takes some practice.
Perfecting Your Stovetop Brew
Using a camp stove gives you a level of precision that’s almost impossible to get over a fire. That control is a huge advantage for methods like pour-over, where water temperature and pouring technique make or break the final cup. A small, single-burner stove provides consistent, adjustable heat.
One of the biggest enemies of good camp coffee is the wind. A sudden gust can suck the heat right out of your kettle, throwing off your brew time and temperature completely. A simple windscreen is an indispensable tool that creates a calm little bubble for your stove to work its magic.
Here’s how to dial in your stovetop technique for a perfect pour-over:
- Heat with Care: Bring your water to a boil, then pull it off the heat and let it sit for about 30-45 seconds. The ideal temperature is just off a rolling boil, which keeps you from scorching those delicate grounds.
- Steady Your Pour: A gooseneck kettle offers incredible control, but you can get by with a regular kettle. Just pour slowly and deliberately in a circular motion to evenly saturate the grounds.
- Pre-Warm Your Mug: On a chilly morning, pouring hot coffee into a cold mug kills the temperature instantly. Swirl a little hot water in your mug and dump it out right before you start brewing. It makes a huge difference.
Managing Heat for Different Brewers
Not all brewers are created equal, and they certainly don't respond to heat the same way. Figuring out how to manage your heat source for your specific method is the secret to unlocking amazing flavor and avoiding a bitter, over-extracted mess.
French Press Tips
A French press is super forgiving, working well on both a stove and near a campfire’s coals. Since the grounds steep directly in the water, exact temperature control is less critical than with a pour-over. Just get your water hot, pour it over the grounds, and let it do its thing. The only rule is to avoid actively boiling the coffee itself.
Pour-Over Pointers
This method demands a bit more attention to detail.
- Use a Stove: For the best temperature regulation, stick with a camp stove.
- Watch the Water: Don't let your water sit at a rolling boil for too long.
- Mind the Bloom: Your first pour should only be enough to wet all the grounds. Let them "bloom" for about 30 seconds before continuing. This releases trapped gasses and sets the stage for a much better extraction.
Whether you prefer the primal feel of a campfire or the fine-tuned control of a stove, mastering these heat management techniques will dramatically improve your outdoor coffee game. It's all about working with the elements, not against them, to create a delicious brew that makes any campsite feel like home.
Quick and Easy Brewing for Minimalist Campers
Let's be honest. Sometimes, the last thing you want to do after crawling out of your tent on a chilly morning is fiddle with a multi-step brewing process.
For minimalist backpackers, casual campers, or really anyone who just wants a great cup of coffee without the fuss, speed and simplicity are everything. Luckily, "quick" no longer means you have to compromise on taste.
Modern convenience has completely changed the game for camp coffee. The days of choking down bitter, bland instant are long gone. Today, specialty roasters are creating products that deliver genuine flavor with virtually no effort. These methods are perfect for saving pack space, cutting down on cleanup, and getting a warm, delicious cup in your hands faster than you can pack up your sleeping bag.
This isn't just a niche trend. The market for travel coffee makers was valued at $1.20 billion and is projected to hit $3.40 billion by 2033. This surge is largely driven by outdoor enthusiasts, as the 66% of Americans who brew coffee daily at home want that same quality at their campsite. You can dig into more stats about the travel coffee market over at htfmarketinsights.com.
The New Wave of Instant Coffee
Forget everything you think you know about instant coffee. The new generation is a world away from the mass-produced powders of the past. It’s crafted from high-quality specialty beans, freeze-dried in small batches to preserve the delicate aromas and complex flavor notes we all love.
These modern instants dissolve completely in hot or cold water, leaving no sludge or residue behind. They offer the ultimate in convenience:
- Zero Gear Required: All you need is a mug and hot water. No brewer, no filters, no mess.
- Ultralight and Packable: Single-serve packets weigh next to nothing and take up almost no space.
- Consistent Flavor: Each cup is perfectly portioned, guaranteeing a delicious brew every single time.
For a deeper dive into what makes modern instant a game-changer for outdoor adventures, check out our guide on the best instant coffee for camping. You'll find some fantastic options that deliver exceptional taste without any of the work.
Single-Serve Pour-Overs and Coffee Bags
If you prefer the taste of brewed coffee but still crave that convenience, single-serve pour-over packets and coffee "tea bags" are brilliant solutions. They strike a perfect balance between a full brewing setup and instant coffee.
Single-serve pour-overs come in small, flat-packed filters pre-filled with ground coffee. They have these ingenious little cardboard arms that fold out to rest on your mug, creating a tiny, disposable dripper. Just add hot water and you get a surprisingly nuanced cup.
Coffee steep bags work exactly like you’d expect—just like tea. Drop one in your mug, add hot water, and let it steep for a few minutes. They're incredibly simple and produce a full-bodied brew similar to a French press, but with zero messy cleanup.
Pro Tip: For coffee bags, gently dunk the bag a few times while it steeps. This little bit of agitation helps the grounds extract more evenly and gives you a richer, more robust flavor.
No-Heat Cold Brew Concentrate
For those who plan ahead, making cold brew concentrate at home is the ultimate set-it-and-forget-it method. It requires zero heat at the campsite, which is perfect for hot weather, areas with fire restrictions, or anyone who just wants a super-smooth coffee ready to go.
The process couldn't be simpler. Before your trip, combine coarse-ground coffee with cold water in a large jar—a 1:4 coffee-to-water ratio works well—and let it steep in your fridge for 12-18 hours. Strain the grounds, pour the concentrate into a bottle, and you're all set.
At the campsite, just dilute the concentrate with water (hot or cold) to your preferred strength. A 1:1 ratio of concentrate to water is a good starting point, but you can adjust from there. This gives you a delicious, hassle-free coffee that’s ready the moment you wake up.
The Four Pillars of a Perfect Outdoor Brew
Brewing a great cup of coffee at your campsite isn’t about luck. It might feel unpredictable out in the wild, but once you have your gear, incredible flavor really comes down to just four things: the coffee grind, your water, the coffee-to-water ratio, and the brew time. Nail these pillars, and you’ll be turning your campsite into your own personal cafe.
Think of it like building a campfire. You need the right size wood (grind), good clean air (water), the right amount of kindling (ratio), and you have to let it burn for the right amount of time. Get one of those wrong, and you're left with a smoky, sputtering mess instead of a roaring fire.
Dialing in Your Grind Size
The size of your coffee grounds dictates how quickly water can pull the flavor out. A consistent grind is the secret here, because it makes sure the extraction is even. If you have a mix of dust and big chunks, the tiny particles will over-extract and turn bitter long before the big pieces have even started to give up their flavor.
Your ideal grind size is all about your brew method.
- Coarse Grind: Think chunky sea salt. This is what you want for methods with long brew times, like a French press or good old cowboy coffee. Using fine grounds here would just create a sludgy, bitter mess.
- Medium Grind: Similar to granulated sugar. This is the sweet spot for drip methods like a pour-over or an AeroPress, as it balances the extraction time and flow rate perfectly.
- Fine Grind: This is closer to table salt. It’s best for quick, high-pressure methods like an espresso maker or a Moka pot, where water is forced through the grounds in a hurry.
Bringing a manual burr grinder on your trip gives you total control and the freshest possible coffee. If you need help finding the right beans to bring along, check out our guide on how to choose coffee beans to match your taste.
The Importance of Good Water
Believe it or not, coffee is about 98% water. That means the quality of your H2O has a massive impact on how your coffee tastes. It's tempting to scoop water straight from that scenic mountain stream, but that's not always the best move for flavor—or your health.
Wild water can have minerals that mute your coffee’s bright notes or add a funky, earthy flavor. Worse, it can contain bacteria. Always, always treat your water first by boiling it for at least one minute (or three minutes if you're above 6,500 feet) or by using a reliable filter. Spring water is usually a fantastic choice, as its balanced mineral content can actually enhance your coffee's natural flavors.
At higher altitudes, water boils at a lower temperature—around 203°F (95°C) at 5,000 feet. This is actually pretty close to the ideal brewing temperature, so you can often pour it right over your grounds as soon as it boils without waiting for it to cool.
Getting Your Ratio Right
The coffee-to-water ratio is what determines the strength and body of your brew. A great place to start for most methods is a 1:16 ratio—that's one part coffee to sixteen parts water. For example, that would be 22 grams of coffee for 350 grams (or ml) of water.
Of course, you probably don't have a digital scale in your backpack. No problem. You can easily eyeball it.
- A standard coffee scoop holds about 2 tablespoons of coffee, which is roughly 10-12 grams.
- For a typical 12-ounce mug, two full scoops will get you a really nice, well-balanced cup.
Don't be afraid to adjust this to your own taste. If your coffee tastes weak, use a little more coffee or a bit less water next time. If it’s too strong, just do the opposite. Part of the fun of camp coffee is adapting to your surroundings and what you like.
Managing Your Brew Time
Finally, brew time is simply how long the water and coffee grounds are in contact. This works hand-in-hand with your grind size to get you that perfect extraction.
Here are some good starting points for popular camping methods:
- French Press: The classic recommendation is a 4-minute steep.
- Pour-Over: You should aim for a total brew time of 2.5 to 4 minutes, from the moment you start pouring to the last drip.
- AeroPress: This one is way faster, usually taking just 1-2 minutes.
Keep in mind that the cold can mess with your brew time. On a chilly morning, your gear and water will cool down faster, which can lead to a weak, under-extracted cup. A simple trick is to pre-warm your mug and brewer with a splash of hot water before you start. It really helps maintain a stable temperature for a richer, more flavorful brew.
Creative Camp Coffee Recipes and Add-Ins
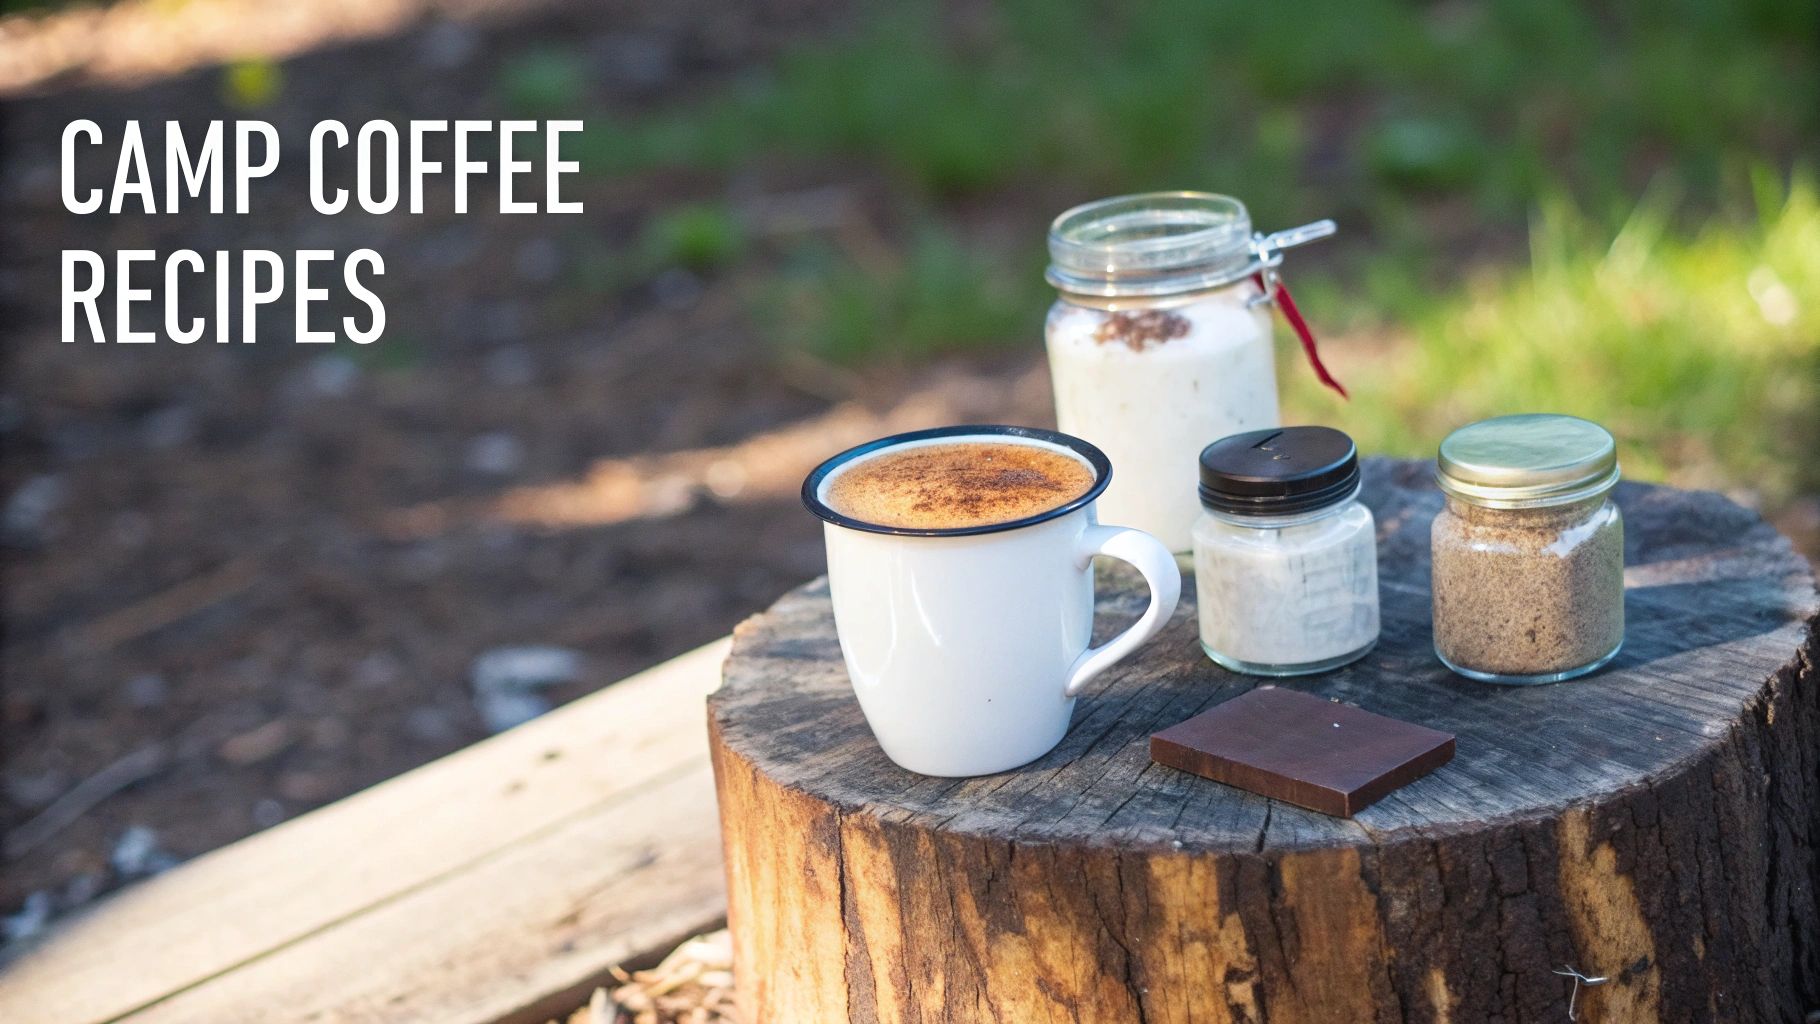
Your morning coffee at the campsite can be so much more than just a routine jolt of caffeine. With a few simple, packable ingredients, you can turn a standard brew into a gourmet experience that elevates the entire morning. Think of it as a blank canvas.
Adding a dash of spice or a touch of sweetness can completely transform the flavor profile, making that sunrise cup an unforgettable part of your adventure. It’s all about finding simple additions that deliver a big impact without weighing down your pack.
Spiced Campfire Mocha
Nothing quite beats a rich, warming mocha on a cool morning, especially one made over a crackling campfire. This recipe feels incredibly indulgent but is surprisingly easy to whip up with just a few extra items in your food bag. It’s the perfect way to reward yourself after a chilly night in the tent.
First, get your coffee brewing using your favorite method—a French press works beautifully for this.
- While the coffee steeps, drop a square of good-quality dark chocolate and a pinch of cinnamon into your mug.
- Pour the hot coffee directly over the chocolate and cinnamon, stirring until everything melts into a smooth, fragrant blend.
- For an extra creamy texture, mix in a spoonful of powdered milk or a splash of shelf-stable oat milk.
This simple combination creates a deeply satisfying drink that feels like a hug in a mug. The dark chocolate adds a welcome richness, while the cinnamon brings a subtle warmth that cuts right through the morning air.
Why it works: Dark chocolate with at least 70% cacao complements the robust notes in a medium or dark roast, like our Lost Without Coffee Co. Trailblazer Blend. It creates a balanced flavor instead of just adding sweetness, and the cinnamon contributes an aromatic complexity without any extra sugar.
Maple Sweetened Cold Brew Refresher
On warmer camping trips or after a strenuous hike, a refreshing cold brew is just the ticket. This recipe uses the natural sweetness of maple syrup to create a smooth, invigorating drink that’s perfect for a lazy afternoon at the campsite. It’s unbelievably simple but feels like a sophisticated trailside beverage.
You can either bring pre-made cold brew concentrate from home or use a quality instant coffee that dissolves easily in cold water.
- Start by filling your mug or bottle halfway with your cold brew concentrate or dissolved instant coffee.
- Add cold, filtered water to dilute it to your desired strength. A 1:1 ratio is a great starting point, but feel free to adjust.
- Stir in a teaspoon of real maple syrup until it's fully dissolved. If you're feeling fancy, a splash of shelf-stable cream or a pinch of nutmeg takes it to the next level.
This drink is a fantastic energy booster that won’t weigh you down. The maple syrup adds a subtle, earthy sweetness that pairs perfectly with the smooth, low-acid profile of cold brew.
Simple Flavor Enhancers to Pack
You don’t need complicated recipes to upgrade your brew. A few non-perishable add-ins can make a world of difference and let you customize each cup to your liking.
- Custom Spice Blends: Before you leave, fill a small shaker with a mix of cinnamon, nutmeg, and a pinch of cardamom.
- Powdered Alternatives: Powdered milk, coconut milk powder, or cocoa powder are lightweight, shelf-stable, and add instant creaminess or flavor.
- Healthy Fats: A small spoonful of coconut oil or MCT oil can add a velvety texture and a slow-burning energy boost for the trail ahead.
- A Touch of Spirit: For an evening warmer, a small splash of whiskey or spiced rum in a dark roast creates the perfect nightcap by the fire.
Responsible Cleanup and Leave No Trace Practices
The ritual of brewing coffee while camping doesn’t end when you take the last sip. Let's be honest, a truly great outdoor experience hinges on leaving the wilderness exactly as you found it. That means responsible cleanup is just as important as the brew itself, ensuring those pristine spots we love stay that way for the next person.
This isn’t just about being a good steward; it’s becoming more critical every year. As more people discover the absolute joy of a campsite brew, our collective impact grows. The global Outdoor Camping Coffee Machine market was valued at a whopping USD 5.8 billion in 2023 and is expected to climb to USD 9.5 billion by 2032. It’s clear that coffee has become a non-negotiable part of our adventures. You can check out more stats on this growing trend at dataintelo.com.
Handling Used Coffee Grounds
So, what do you do with those wet, used grounds? The golden rule of Leave No Trace is refreshingly simple: pack it in, pack it out.
Dumping coffee grounds on the forest floor is a big no-no. They aren't a natural part of that ecosystem, they can attract wildlife, and they take a surprisingly long time to break down.
- Pack Them Out: This is the best and easiest method. Just let your grounds cool completely, then seal them up in a reusable container or a sturdy zip-top bag to carry home.
- Composting (With Caution): If you're at a developed campsite that actually has dedicated composting facilities, go for it. But never, ever toss them in a pit toilet or bury them. This messes with the soil and is basically a dinner bell for local critters.
Your morning brew shouldn’t become an afternoon snack for a bear or a curious squirrel. Packing out grounds is the simplest way to keep wildlife wild and prevent future campers from having unwanted encounters.
Cleaning Your Gear Responsibly
When it comes to washing your brewer and mug out in the wild, think minimalist. The goal is to use as little water and soap as possible—and to do it far away from any natural water sources.
Here’s a low-impact way to get it done:
First, use a spatula or even just your finger to scrape as many of the leftover grounds as you can into your "pack out" bag.
Next, pour a small amount of hot water into your gear and swish it around to loosen up anything that's left.
If you absolutely need soap, use just a single, tiny drop of a biodegradable, unscented kind.
Finally, and this is the important part, walk at least 200 feet (that’s about 70 big steps) away from any lakes, rivers, or streams to dispose of this "greywater." Scatter it widely over the ground so the soil can filter it naturally. Let everything air dry before packing it up, and you're good to go.
Your Top Camp Coffee Questions, Answered
Let's be honest, even the most seasoned campers run into a few snags when brewing coffee in the wild. Things just work a little differently out there. Here are some real-world answers to the questions we get asked most often, so you're ready for whatever the trail throws at you.
One of the biggest battles is simply keeping your coffee hot, especially when there's a morning frost on the ground. Your best friend here is a good insulated, double-walled mug—it's a total game-changer. Also, try this little pro-tip: pre-warm your mug and your brewer with a splash of hot water before you start. It makes a surprising difference and stops the cold ceramic from instantly stealing your heat.
Can I Pre-Grind My Coffee Beans?
You absolutely can. While we all love the ritual of grinding beans fresh, pre-grinding at home is a brilliant shortcut to save time and pack space. The key is to keep it as fresh as possible.
To lock in that flavor, try grinding your coffee no more than a day before you head out. Store the grounds in an airtight, opaque container. Better yet, portion out each day's coffee into individual sealed bags. This little trick minimizes air exposure and keeps the rest of your coffee from going stale halfway through your trip.
We’ve all been there: you get to camp and realize you forgot the filters for your pour-over. Don't panic. A clean bandana or a piece of a t-shirt can work as a makeshift filter in a pinch. It’s not going to win any awards, but it will absolutely save your morning.
How Does Altitude Affect Brewing?
This is a great question because altitude definitely changes the game. Water boils at a lower temperature the higher you go—at 5,000 feet, it boils around 203°F (95°C). Funnily enough, this is actually right in the sweet spot for a perfect brew, so you often don't need to let the water cool after it boils.
The flip side is that the lower atmospheric pressure can sometimes lead to a weaker extraction. If your coffee tastes a bit thin, you might need a slightly longer brew time or a finer grind to pull out all that great flavor. Don't be afraid to experiment a little to see what tastes best.
Ready to make your next camp coffee the best you've ever had? Explore the full collection of outdoor-ready beans and gear from Lost Without Coffee Co. at https://www.lostwithoutcoffee.com and fuel up for your next adventure.