
The Best Coffee for Backpacking a Trail-Tested Guide
When you’re out on the trail, that first cup of coffee is more than just a morning routine—it’s a ritual. It can set the tone for a long day of hiking, warm you up on a cold morning, and give you the kick you need to get moving.
But backpacking coffee is all about balancing trade-offs. For ultralight hikers counting every gram, specialty instant coffee is often the top choice, offering almost zero prep time and the smallest possible footprint in your pack. For those who can’t stomach the thought of sacrificing flavor, single-serve pour-over pouches deliver a far superior brew for just a tiny penalty in weight and pack space.
Why Your Trail Coffee Choice Matters
Think of your trail coffee like you think about your shelter. An ultralight tarp is fast, efficient, and weighs next to nothing. A freestanding tent, on the other hand, offers more comfort and a better night’s sleep. Neither is wrong—they just serve different priorities.
The same logic applies to your morning brew. The goal is to match your coffee choice to your personal backpacking style. This guide will walk you through the core factors at play, so you can make a smart, satisfying decision before you even lace up your boots. We’ll cover everything from the nitty-gritty logistics to the finer points of flavor.
Key Factors for Backpacking Coffee
Before you start tossing different coffees into your shopping cart, let's break down the criteria that really define a great trail coffee. Every choice you make will be a balance of these four elements:
- Format: Are you going with instant crystals, pre-ground beans, or a self-contained pour-over? This is the single biggest decision you'll make.
- Weight & Packability: How much space will it hog in your pack, and what does each serving weigh? Remember, ounces add up to pounds pretty damn fast out there.
- Convenience & Brew Time: How much fuss is involved in turning that packed coffee into a hot cup? Speed is often critical on frosty mornings when you just want to get moving.
- Flavor & Quality: Does the final cup actually taste good? A disappointing, watery brew can be a real morale-killer when you're miles from civilization.
Finding the best coffee for backpacking isn’t about some universal "best" option. It's about finding your personal sweet spot where flavor, weight, and convenience intersect. There's no single perfect answer, only the perfect answer for your adventure.
Now, let's get a clearer picture of how the most popular formats stack up against one another.
Backpacking Coffee Options at a Glance
This table breaks down the pros and cons of the main coffee formats you'll encounter. Use it as a quick reference to see which one best aligns with your hiking style.
| Coffee Format | Best For | Weight/Packability | Convenience | Flavor Profile |
|---|---|---|---|---|
| Instant Coffee | Ultralight hikers and those prioritizing speed and minimal weight. | Excellent | Excellent | Varies, but generally the weakest. Specialty instant is better. |
| Single-Serve Pour-Overs | Flavor-focused backpackers who want a craft coffee experience. | Good | Very Good | Excellent, close to a freshly brewed cup from home. |
| Pre-Ground Coffee | Campers with more space who use a French press or similar brewer. | Fair | Good | Good, but freshness degrades quickly once the bag is opened. |
| Whole Bean Coffee | Die-hard coffee purists who carry a portable grinder. | Poor | Poor | Excellent, but requires the most gear and effort. |
As you can see, there's a clear give-and-take. Instant coffee wins on weight and ease, while pour-overs and beans take the prize for taste. The key is deciding what you value most when you’re miles deep in the backcountry.
It's no secret that the world runs on coffee—globally, people drink an incredible 2.25 billion cups every single day. Most of us are used to brewing a quality cup at home, and there's no reason to give that up on the trail. That's exactly why portable solutions like the single-serve pour-over pouches from Lost Without Coffee Co. exist. They bridge the gap between home-brewed quality and trail-ready convenience, ensuring that caffeine boost is one you'll actually enjoy. After all, just like the world's top coffee drinkers, backpackers depend on that fuel to power the journey. You can learn more about coffee consumption trends and see how they're shaping great on-the-go options.
Choosing Your Brew Format: Lightweight Versus Flavor
Every coffee lover who’s ever shouldered a pack has faced the same classic dilemma: do you go for the lightest pack possible, or do you insist on the richest, most satisfying cup of coffee to start your morning on the trail?
This is the ultimate trade-off, and how you answer it will point you straight to the perfect coffee for your trip. There’s no single right answer here—only what’s right for your hiking style.
It’s a lot like choosing your shelter. Are you the ultralight thru-hiker who swears by a Dyneema tarp—feather-light and efficient, but not exactly luxurious? Or are you the weekend warrior who doesn't mind a few extra ounces for a spacious tent that feels like a palace after a long day? Your coffee choice follows the exact same logic. Let’s break down the four main contenders.
This decision tree helps visualize that choice between pure, ultralight efficiency and maximum trailside flavor.
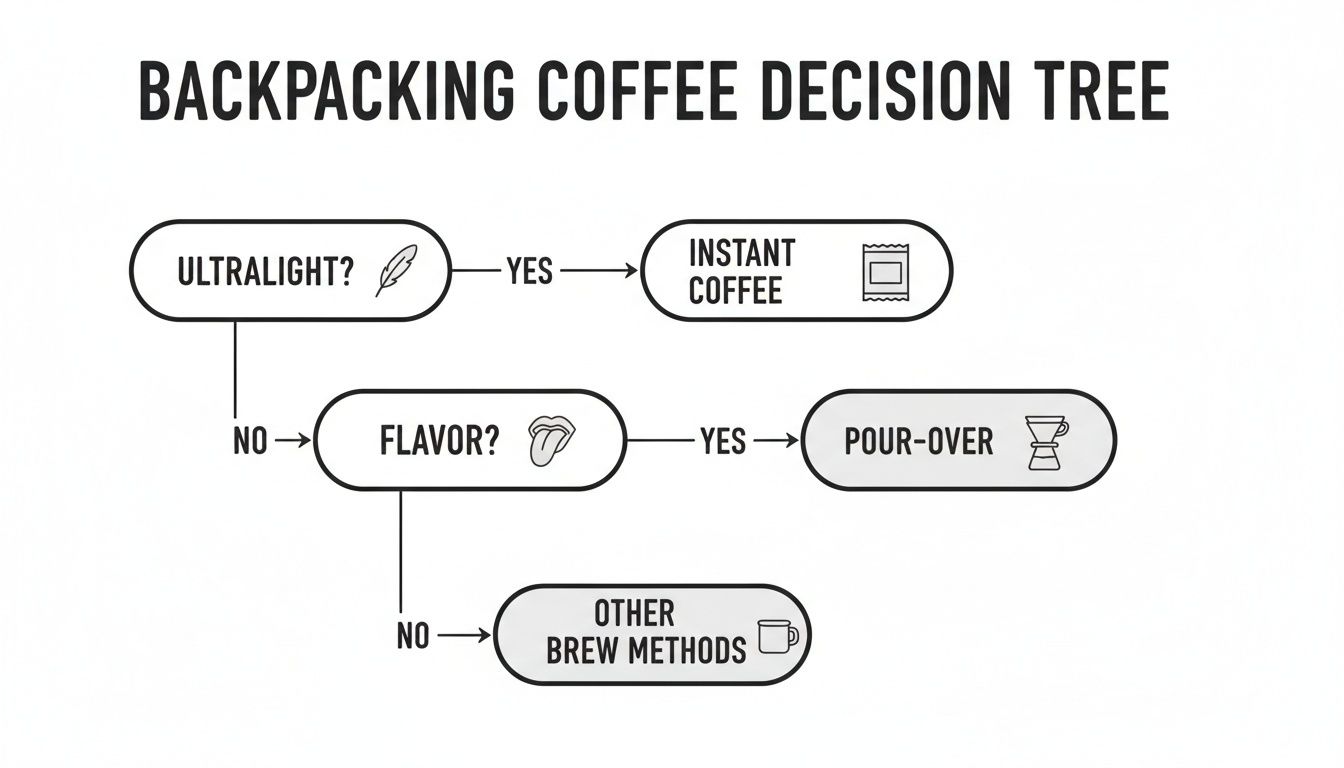
As you can see, if shedding every possible gram is your top priority, instant coffee is your go-to. But for those who refuse to compromise on a great cup, pour-over options deliver big on taste.
To help you decide, let's take a closer look at the pros and cons of each format. This table breaks down what really matters on the trail—weight, gear, time, and of course, flavor.
Detailed Comparison of Coffee Formats for the Trail
| Format | Average Weight (per serving) | Required Gear | Brew Time | Flavor Potential | Ideal Trip Length |
|---|---|---|---|---|---|
| Whole Bean | 20-25g (plus grinder) | Hand grinder, brew device | 5-7 min | Excellent | 1-2 days (car camping) |
| Pre-Ground | 20-25g | Brew device (AeroPress, pour-over) | 3-5 min | Good (but fades fast) | 2-3 days |
| Instant | 2-5g | Mug, hot water | < 1 min | Good (specialty) | Any length (ideal for 5+ days) |
| Single-Serve | 12-15g | Mug, hot water | 2-3 min | Very Good | Any length (ideal for 1-5 days) |
Each option has its place, but as you can see, the choice comes down to how you balance your desire for a great cup with the demands of the trail. Now, let’s dig into the specifics of each one.
Whole Bean Coffee: The Purist’s Heavy Burden
For the absolute coffee purist, nothing can beat the aroma and taste of grinding your beans right before you brew. Bringing whole beans gives you peak freshness and total control over your grind size, which is perfect for methods like an AeroPress or a portable French press.
But let’s be real—this commitment comes with a heavy penalty. You have to carry the beans and a hand grinder, adding significant weight and bulk to your pack. This is the backpacking equivalent of hauling a cast-iron skillet into the woods. Sure, it delivers incredible results, but it’s impractical for all but the shortest, most luxurious trips.
Pre-Ground Coffee: The Familiar Compromise
Pre-ground coffee feels like a great middle-ground. You get the authentic flavor of real coffee without needing to pack a grinder. It’s a simple, familiar option that works great with all kinds of brewing gear, from pour-over cones to camping percolators.
The catch? Freshness. As soon as coffee is ground, it starts losing its amazing aromatic compounds to oxidation. On a day trip, you might not notice. But by day three or four of a multi-day trek, that once-vibrant coffee will taste disappointingly stale and flat, no matter how perfectly you brew it.
Instant Coffee: The Ultralight Champion
For anyone who lives by the motto "ounces equal pounds," instant coffee has long been the undisputed king. Its appeal is obvious: it’s feather-light, incredibly compact, and requires zero extra brewing gear. Just a cup and hot water. It doesn’t get any simpler.
Now, instant coffee has a well-deserved reputation for tasting… well, terrible. But the game has completely changed. Modern specialty instant coffees are a world apart from the bitter crystals of yesterday. Companies like Lost Without Coffee Co. use high-quality beans and advanced freeze-drying to preserve the coffee’s original flavor, offering a surprisingly robust and enjoyable cup for a tiny weight penalty.
The evolution of backpacking coffee mirrors that of camping gear itself, moving from heavy, rustic solutions to lightweight, high-performance options. Today’s specialty instant is the Dyneema tent of the coffee world—ultralight, efficient, and surprisingly capable.
The shift has been dramatic. After the last recession, instant coffee sales surged by 40% among campers. It’s easy to see why when a tiny 2-ounce pouch can make 20 cups of coffee—a stark contrast to the 5 pounds of beans you'd need for the same amount. For serious hikers and campers, that means finally leaving the heavy grinders behind. You can explore more fascinating coffee statistics and discover how consumption trends are evolving.
Single-Serve Pour-Overs: The Best of Both Worlds?
For a growing number of backpackers, single-serve pour-over pouches hit the absolute sweet spot between convenience and quality. These ingenious little packets contain perfectly portioned grounds inside a self-contained filter that just unfolds and rests on your mug. You get the satisfying ritual and superior flavor of a pour-over brew without any of the mess or extra gear.
They weigh just slightly more than an instant coffee packet but produce a cup that is miles ahead in taste and aroma. For anyone who believes a great morning on the trail starts with a genuinely great cup of coffee, that minor weight penalty is a trade they are more than happy to make.
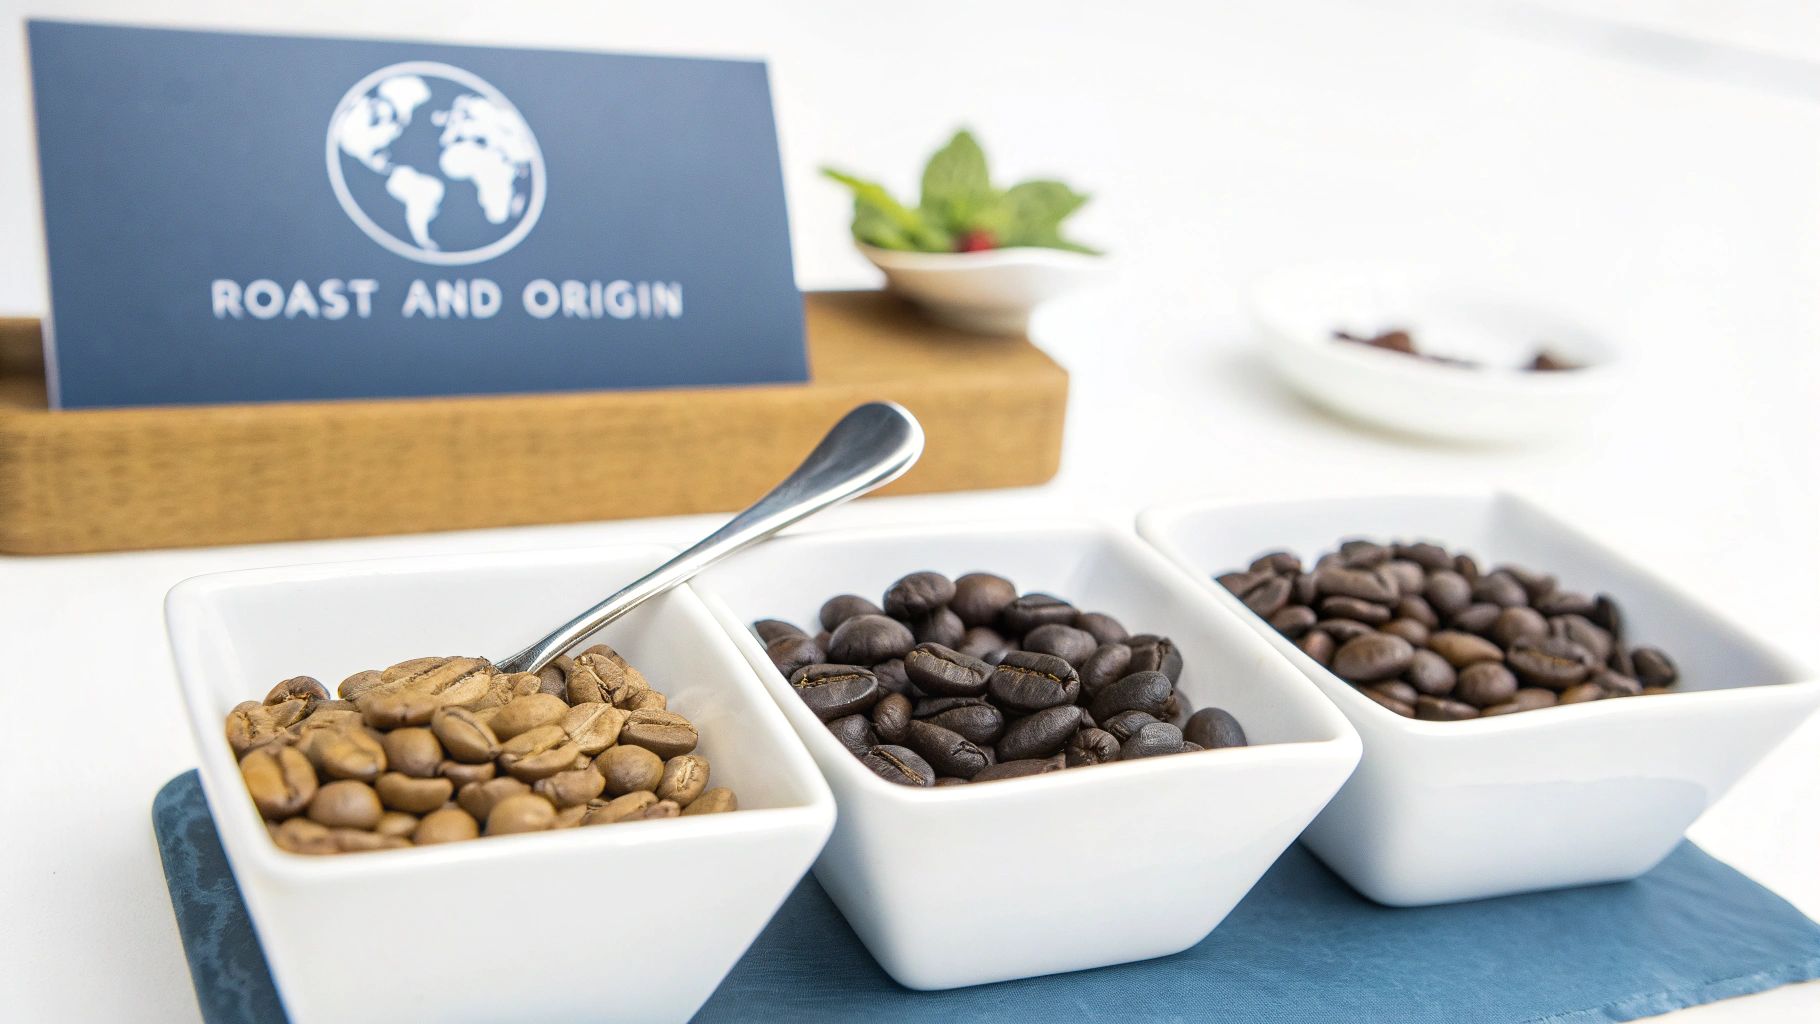
How Roast, Grind, and Origin Impact Your Brew
Beyond just picking a format, the coffee itself is what really makes or breaks that morning ritual on the trail. Getting a handle on roast, grind, and origin is a bit like learning to read a topo map—it gives you the power to navigate the world of flavor and pinpoint the perfect brew for your adventure. These three elements are the true north of taste in your cup.
Think of the roast profile as the coffee bean's cooking process. Just like toasting a marshmallow, the longer you heat a bean, the more its entire character changes. This transformation has a huge impact on both flavor and caffeine, making it a critical choice for your trail coffee.
Decoding Roast Profiles
Each roast level delivers a totally different experience, perfect for different moods and trail conditions. Nailing this choice can elevate a simple cup of coffee into a moment you'll remember long after you've packed up camp.
-
Light Roast: These beans spend the least amount of time in the roaster, which means they hold onto most of their original, delicate flavors. You can expect bright, acidic notes, often with a fruity or floral vibe. Light roasts also pack a slightly bigger caffeine punch, making them a fantastic choice for a crisp, high-energy start to a long day on your feet.
-
Medium Roast: For many, this is the sweet spot. A medium roast strikes a beautiful balance, dialing back the sharp acidity of a light roast while bringing out deeper notes of caramel, chocolate, and nuts. It’s got a smooth, well-rounded body and a familiar, comforting flavor that’s just about perfect next to a morning campfire.
-
Dark Roast: Roasted the longest, these beans are all about bold, robust flavor with very little acidity. The intense heat brings oily sugars to the surface, creating those classic bittersweet, smoky, and rich chocolatey notes. A dark roast is the ideal companion for a cold, misty morning when you need a powerful brew to warm you from the inside out.
The Importance of Grind Size
If you're grabbing pre-ground coffee or single-serve pour-overs, don't sweat this—the grind size is already dialed in for you. But if you’re grinding at home before a trip, getting it right is everything. The size of your coffee grounds dictates how quickly water can pull flavor out of them.
For most backpacking brew methods like a pour-over or an AeroPress, a medium grind is your most reliable, all-around player. It should look something like coarse sand. This provides a balanced extraction—not so fast that your coffee is watery, and not so slow that it turns bitter.
Choosing your coffee's roast and origin is more than a technical detail; it's about curating your backcountry experience. A bright Ethiopian light roast can match the energy of a summit sunrise, while a rich Guatemalan dark roast can feel like a warm blanket on a frosty morning.
How Origin Shapes Flavor
Finally, where your coffee is grown has a massive impact on its taste. The specific soil, altitude, and climate of a region—what the pros call terroir—give the beans a unique flavor signature, just like with wine grapes.
- Ethiopian Coffees: Often deliver bright, floral, and citrusy notes. Think of a complex cup with hints of bergamot and berry.
- Guatemalan Coffees: Known for their full body and rich, chocolatey flavors, often with a touch of spice or toffee.
- Brazilian Coffees: Typically offer a nutty, sweet, and low-acidity profile, making for an incredibly smooth and satisfying brew.
Exploring different origins is like traveling the world with your taste buds, right from your campsite. To really go deep on how roasters bring these unique flavors to life, check out our complete guide to fresh roasted coffee beans and see why freshness is the key to unlocking these amazing profiles.
Essential Brewing Methods for the Backcountry
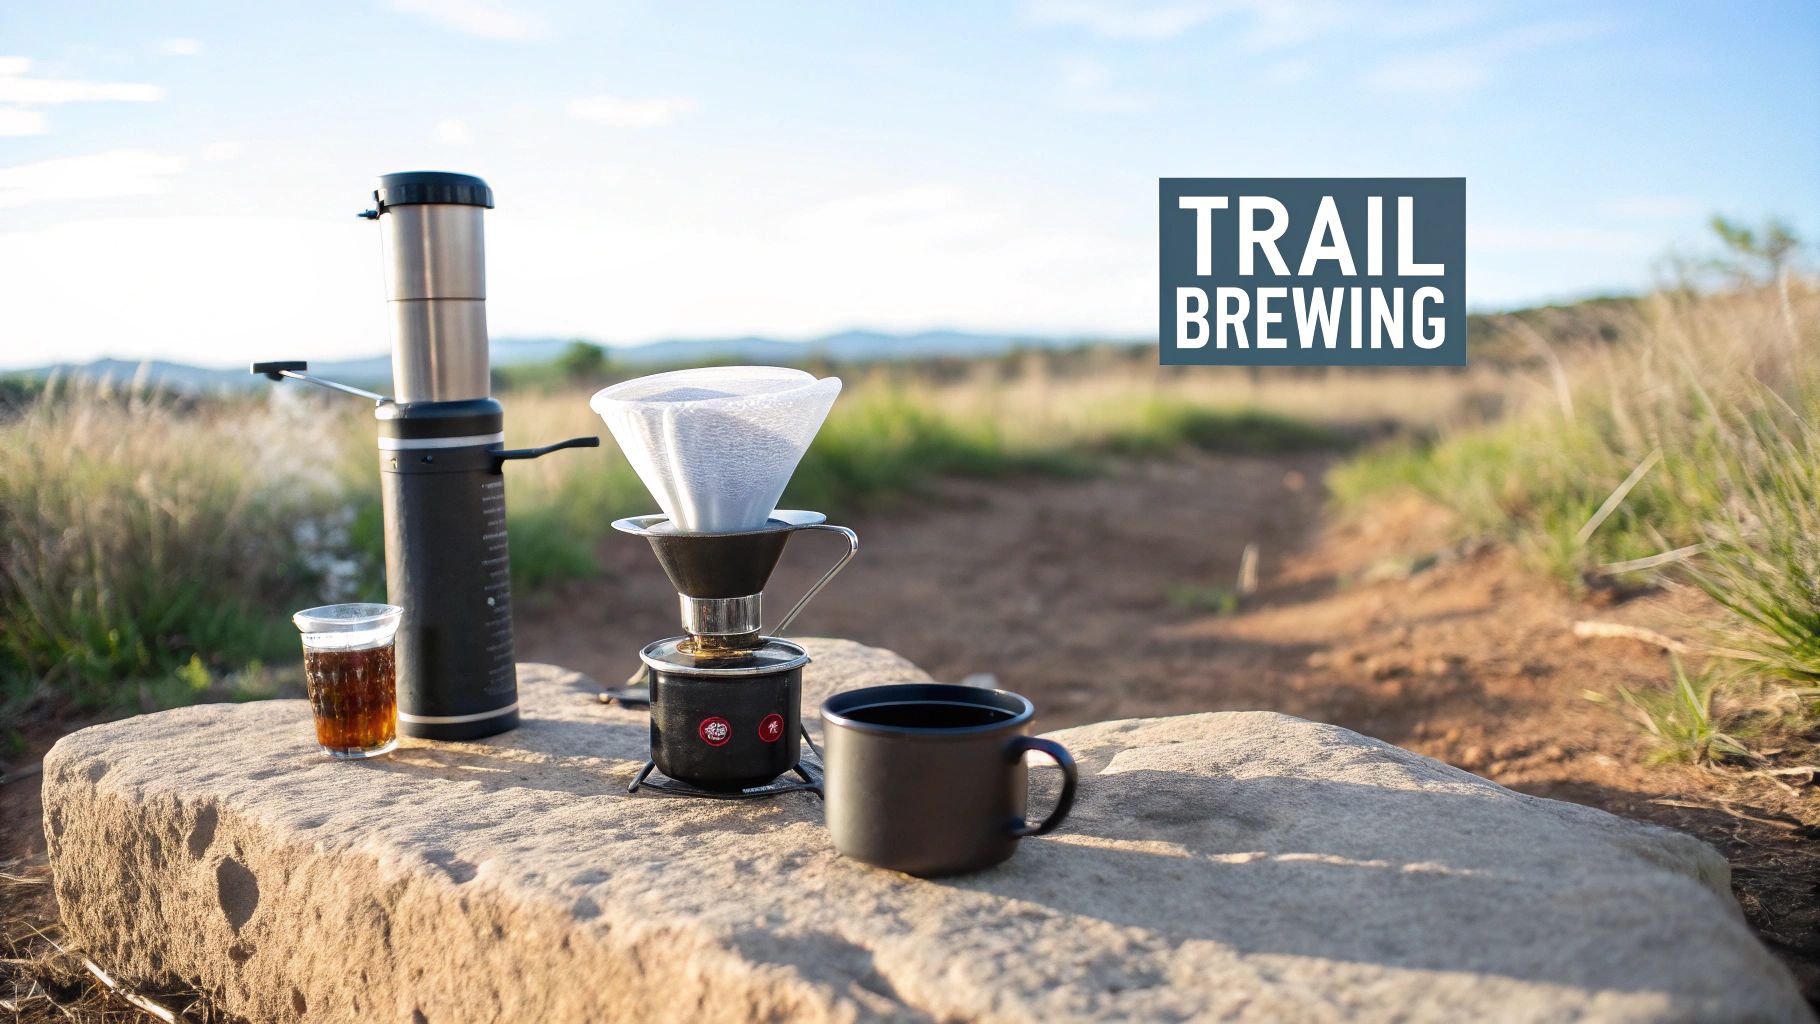
Choosing the perfect beans is only half the battle. Without a solid brewing plan, even the best coffee can fall flat out on the trail. Your brew method is that final, critical step that turns carefully selected grounds into the soul-warming cup you’re dreaming of at sunrise.
Thankfully, the market is full of brilliant solutions designed specifically for the trail. From ultralight and simple to gourmet and involved, there’s a method that’ll perfectly match your hiking style. Let's walk through the most popular options so you can brew a perfect cup, no matter how far you are from home.
The AeroPress: A Backpacker Favorite
There's a reason the AeroPress has earned legendary status among backcountry coffee lovers. This lightweight, durable brewer uses a clever combination of immersion and pressure to create a uniquely smooth, rich, and grit-free cup in about a minute.
It’s also incredibly versatile. You can make everything from a strong, espresso-like shot to a full-sized Americano. Its compact design packs down neatly, and cleanup is a breeze—just press the plunger all the way through to pop out a dry puck of grounds, which you can easily pack out. It has a few more parts than a simple pour-over, but its speed and consistently excellent results make it a top contender.
Portable Pour-Over Drippers
For those who love the clean, nuanced flavor of a classic pour-over, there are countless trail-ready options. These range from ultralight plastic or silicone cones that collapse flat to elegant titanium drippers that barely weigh a thing. The process is simple and almost meditative: place the dripper over your mug, add a filter and grounds, and slowly pour hot water over them.
The main advantages here are fantastic flavor extraction and pure simplicity. It requires minimal gear and gives you a clean cup without any sediment.
- Collapsible Drippers: These are often the lightest choice, weighing less than an ounce and taking up virtually no space.
- Reusable Filters: Some models have integrated mesh filters, which cuts down on paper waste but requires a bit more cleaning.
- Single-Serve Pouches: As we've mentioned, these are the ultimate in pour-over convenience, combining the filter and grounds in one tidy package.
Historically, coffee's appeal on the trail soared as freeze-dried instants became available post-WWII, cutting weight by up to 95% compared to whole beans. Today, that focus on efficiency continues, but with a renewed emphasis on quality. Studies now show that 82% of consumers will gladly pay more for sustainable, high-quality coffee, making premium beans a worthy addition to any pack.
The Camping French Press
Nothing quite beats the full-bodied, robust brew from a French press, and several companies now make trail-worthy versions. These are usually built into insulated mugs or designed to work with popular cooking pot systems. The method is straightforward: steep coarse grounds directly in hot water for a few minutes before plunging a mesh filter to separate them out.
This technique creates that rich, oily cup that so many coffee lovers adore. However, it’s generally one of the heavier and bulkier options, and cleanup can get messy when you're dealing with wet, sludgy grounds. It’s a fantastic choice for car camping or shorter trips where comfort outweighs counting every gram.
If you love this method, you can dive deeper into our complete guide on how to make perfect French press coffee for tips that work just as well at camp as they do at home.
Pro Tip for High Altitudes: Water boils at a lower temperature the higher you climb. Above 9,000 feet, your water may not reach the ideal brewing temperature of 195-205°F. To compensate, just increase your brew time by 30-60 seconds to ensure a full, proper extraction.
Cowboy Coffee: The Minimalist’s Brew
Finally, there’s the timeless, no-gear-required method: cowboy coffee. All you need is a pot, water, coffee grounds, and a heat source. Simply bring your water to a near boil, pull it from the heat, and stir in your grounds. Let them steep for a few minutes until they settle at the bottom.
A little trick to help the grounds settle faster is to sprinkle a bit of cold water on top. Then, pour slowly and carefully to leave the sediment behind. While it’s the most ultralight method possible, it definitely takes some practice to master and almost always leaves a little grit in your cup. Still, it’s a fantastic backup plan and a fun skill to have, connecting you to a long tradition of brewing in the great outdoors.
Packing Smart for Freshness and Leave No Trace
Your coffee is only as good as how you pack it. After you've picked the perfect beans for your trip, the next challenge is keeping them fresh while respecting the wild places you're exploring. Smart packing is the key to protecting flavor and upholding the critical principles of Leave No Trace.
For ground coffee, the enemies are air, moisture, and sunlight. Your best bet is to repackage your grounds from their main bag into a small, airtight container. Think of it like a tiny vault for flavor—the less empty space, the better, as it minimizes the oxidation that makes coffee taste flat and stale.
Storing for Peak Freshness
The right container makes all the difference, especially on a multi-day trek. To protect your precious cargo, consider a few solid options:
- Small Plastic Jars: Look for durable, screw-top containers that create a solid seal against moisture. Simple and effective.
- Reusable Silicone Bags: These are lightweight, flexible, and have the added bonus of letting you squeeze out excess air before sealing.
- Waterproof Packaging: This is where our single-serve options really shine. The individually sealed, waterproof pouches protect the grounds perfectly until the moment you're ready to brew.
This attention to detail is more than just about a good cup. Globally, people are drinking 2.3 billion cups of coffee a day, and with that comes a growing awareness of sustainable and ethical practices. It's a value we share, and it's something we see reflected in the rising demand for high-quality, convenient coffee on the trail.
Coffee and Leave No Trace Principles
Brewing coffee in the backcountry comes with a simple but serious responsibility: leave the environment exactly as you found it. This means every part of your coffee ritual—from the grounds to the packaging—needs to be completely low-impact.
The core ethos of Leave No Trace is simple: Pack it in, pack it out. This applies to everything, including your used coffee grounds and all packaging. They are not a natural part of any ecosystem.
Here’s how to apply this to your trail coffee routine:
- Pack Out All Grounds: Coffee grounds don't decompose quickly and can attract animals, disrupting the local ecosystem. The only responsible practice is to pack them out in a dedicated small, sealed bag. No excuses.
- Minimal Impact Cleaning: When cleaning your AeroPress or pot, use as little water as possible and make sure you're at least 200 feet away from any stream, lake, or river. Often, a quick wipe is all you really need.
- Manage All Packaging: Every single-serve pouch, instant coffee packet, or paper filter must be packed out with you. Leave nothing behind.
Following these simple rules ensures that your comforting morning ritual doesn’t come at the expense of the beautiful places we all love to explore. For more tips on trail etiquette, our guide on the best coffee for camping has some extra insights.
A Few Final Questions About Backpacking Coffee
Even with the perfect setup, a few questions always come up when you're trying to nail down your trail coffee game. Getting these details sorted can be the difference between a rough start and a perfect morning brew. Let's clear up some of the most common ones.
How Much Coffee Should I Actually Pack?
My go-to rule is to plan for 1.5 to 2 servings per person, per day. That gives you a solid morning cup and leaves room for an optional afternoon pick-me-up.
If you’re rolling with instant coffee, that’s about one or two packets each day. For grounds, you'll want to budget around 20-25 grams (roughly 4 heaping tablespoons) for a good, strong cup. So for a three-day solo trip, I’d pack six instant packets or about 120-150 grams of ground coffee. And I always, always toss in one extra serving, just in case. You never know when you'll get delayed or face an unexpectedly cold morning.
Is Bringing a Hand Grinder Really Worth It?
Honestly, for most of us counting every ounce, a hand grinder just isn't worth the weight and bulk. There's no denying that fresh-ground beans deliver the absolute best flavor, but for a few days on the trail, high-quality pre-ground coffee sealed in an airtight bag is more than good enough.
When you're out for a multi-day trek, the sheer convenience and weight savings you get from specialty instant or single-serve pour-overs almost always trump the tiny flavor boost you'd get from hauling a grinder.
What’s the Most Eco-Friendly Way to Drink Coffee Outside?
The most sustainable route is buying ethically sourced, whole bean coffee in bulk and packing it in a reusable container. It creates the least amount of trash, period. But, and this is a big but, it means you have to be totally committed to packing out every single one of your used grounds.
While single-serve options create more individual waste, the real key is just sticking to Leave No Trace principles. No matter what kind of coffee you bring, pack out everything you packed in. That means every wrapper, every filter, and all your grounds.
Can I Make Good Coffee on the Trail with Cold Water?
Absolutely. Cold brew is a fantastic, fuel-saving move for the trail. Just toss your coffee grounds and cold water into a sealed, leak-proof bottle. A good starting point is a ratio of about one part coffee to four or five parts water.
Let it steep for 12-24 hours—I usually mix it up in the morning so it’s ready for the next day. Once it's done, just strain the grounds out carefully, and you’ve got a smooth, potent coffee concentrate ready to go.
Ready to find the perfect brew for your next adventure? At Lost Without Coffee Co., we offer premium, ethically sourced beans and package them in trail-ready formats, including convenient single-serve pour-overs, so you never have to compromise on a great cup outdoors. Explore our collection and fuel your journey.